Pages

Tuesday, May 28, 2013

Salesforce Sandbox Refresh


Available in: Enterprise, Unlimited, and Database.com Editions only

Permission to view sandbox: “View Setup and Configuration
Permission to create, refresh, activate, and delete sandbox: “Modify All Data

From Spring '13 release, newly created sandboxes have the default email deliverability setting System email only. The System email only setting is especially useful for controlling email sent from sandboxes so that testing and development work doesn't send test emails to your users.

From Summer '13 release, you can create sandbox Template to choose data included only for Full sandbox.

You can refresh Full Sandbox every 29 days.
You can refresh Developer & Configuration Only Sandbox once a day.

Sandbox Status:
  • Copying, the initial creation stage. When you create (or refresh) a sandbox, Salesforce copies the configuration and data you specify to the sandbox. A sandbox in the “Copying” stage is not yet ready for use. Copy time depends on the size of the data, and can take several hours.
  • Ready for use, Salesforce finished copying data to the sandbox, and you can log into the sandbox or run application tests on the sandbox.
  • Replacement Ready, this status indicates Salesforce has a copy of your object data and is ready for you to activate the sandbox so you can use it.
  • In use, sandbox already activated and in use.

Login to Salesforce sandbox, from https://test.salesforce.com by appending .sandbox_name to their Salesforce usernames. For example, if a username for a production organization is user1@acme.com, and the sandbox is named “test”, then the modified username to log into the sandbox is user1@acme.com.test.

Once refresh, sandbox organization ID will be changed and may appear in different instance, e.g. cs6, cs3, cs12, etc.

Refresh link will be visible in a sandbox when it is eligible for refreshing.

Activate link to activate a refreshed sandbox. Activating a refreshed sandbox replaces the existing sandbox with the refreshed version. This permanently deletes the existing version and all data in it.

Few important date and time related to sandbox refresh
- Requested: date and time when admin click Refresh link
- Finished : date and time when Salesforce finish copying data to new sandbox
- Activated: date and time when admin click Activate link, old sandbox will be delete
- Copied On: date and time when Salesforce provision newly refresh sandbox and ready to use

For more information on sandbox, see this documentation.


Sunday, May 19, 2013

Disable user login to Salesforce temporary


From Salesforce Community, from time to time, I see people asking questions for best-practice to disable user login to Salesforce temporary for major/change release in Salesforce within an organization.

Back to the real need, do we need to block user to login to Salesforce? YES and NO, depend on the changes, but if it is a YES.
Do we need to inactive user? a BIG NO. Why? Inactivate user will:
- Remove user from all delegated groups and sharing privileges
- Remove user from opportunity team of closed & open opportunity (optional)
- Remove user from account team (optional)
- Remove user from case team of predefined & ad-hoc (optional)
So, how to block user to login to Salesforce if not inactivated them?
Play with the User Profile. Here we go:

1. Create a dummy Profile
After profile created, scroll to 'Login Hours' related list and set Start Time and End Time to 12:00AM


2. Export user list and their profile id to CSV file
Use Data loader to export all Active User
Here is the SOQL:
Select u.Id, u.ProfileId from User u where u.isActive = True

3. Update Profile Id in CSV file with newly created dummy Profile Id
Save CSV file into new file name
Make sure your (admin) user id is not included

4. Mass update User Profile in Salesforce
Use Data loader to update it to User object using CSV file modified

5. Deploy your Salesforce major / change release

6. Update back User Profile Id in Salesforce using original CSV file 

When you do the changes, any user will not able to login to Salesforce. You will be able to track who is trying to login from Login History


But, before all downtime planned in action, you should communicate it with all of your users few days in advance.

Tuesday, May 14, 2013

Salesforce: Roll-Up Summary field for running number


Few days ago, when following Salesforce Community conversation, a member asked for running number in  Opportunity based on Account Number.

Using trigger, this is not an issue at all. A trigger in Opportunity on create and update will work perfectly. But, not every salesforce.com admin is familiar with apex code which usually do by a Salesforce.com developer.

Is is possible just using configuration, point and click without coding?
YES, here we go:

1. Create roll-up summary field in Account 
Filter Criteria = All records should be included in the calculation
You can hide this field from page layout.
It will hold number of opportunity for that Account.
Example: Number of Opportunities


2. Create a text field in Opportunity
This field will show the Account Number + running number.
Let's say Account Number = SF-0100, the first Opportunity will have Tracking Number = SF-0100-1, the second will be SF-0100-2 and etc.
Example: Tracking Number


3. Create a workflow in Opportunity
Just make sure, Evaluation Criteria = created and Rule Criteria = true


4. Create a field update in Opportunity
The formula would be:
Account.AccountNumber +'-'+ TEXT(Account.Number_of_Opportunities__c+1)


Drawback:
Issue will arise if any opportunity created earlier get deleted. Running number in opportunity will keep running, except the opportunity deleted is the last opportunity.

Tuesday, May 7, 2013

Salesforce validation rule or workflow, use 15 or 18 characters Id?

Each Salesforce Id will have unique 15 or 18 characters. What is the different?
15 characters for case sensitive and 18 characters for case insensitive.
You also can use build-in function from Salesforce to convert 15 to 18 characters Id using CASESAFEID(Id) function.
See sample below:
00180000010shNA --> 00180000010shNAAAY
00180000010shNa --> 00180000010shNaAAI

There are few website provide tool to convert from 15 to 18 characters, example:

In this blog, I would like to share on using Salesforce Id on validation rule and workflow.

1. Only 15 characters Id will work in Validation Rule or Workflow
Test on 15 and 18 characters of Salesforce Id in validation rule and Workflow. Validation rule and Workflow only work with 15 characters Id, NOT in 18 characters Id.

2. Suggest to use $Profile.Name instead of using $Profile.Id or $User.ProfileId


See 2 validation rules below, which one is better (make our life easier) ?
AND (
NOT($User.ProfileId="00e800000017ey7"), 
NOT($User.ProfileId="00e800000018hwW"), 
ISPICKVAL(PRIORVALUE(StageName), "6 Close - Lost") 
)

AND (
NOT($Profile.Name="Regional Sales Ops"), 
NOT($Profile.Name="Global Sales Ops"), 
ISPICKVAL(PRIORVALUE(StageName), "6 Close - Lost") 
)

3. Use = instead of == 
Both == and = is working, but SFDC suggest to use = ; It's good idea to make it standard to use only =
 

Friday, May 3, 2013

Salesforce to Salesforce: manual accept and stop sharing


Continuing from previous blog about partner blog. A user said that we supposed not to accept everything send by our partner, it maybe 'junk' data. So... how? Easy, just set in Subscribed Object in Connections not to Auto-Accept.


How to Accept?
Go to object tab, example: Account tab (this will accept related child objects automatically, example: Contact, Opportunity). You should see "Accounts from Connections" in a related list and you can create new view as preferred.


User can manually accept each record. To note, there is NO "reject" link, so to reject an incoming record, you need to notify publisher to stop sharing.

How to know record being shared?
You can run a report or create a view with filter:
- Received Connection Name for record shared to us
- Sent Connection Name for record share to partner instance


How about if we do not want user able to stop sharing?

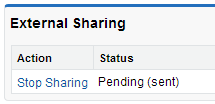
Remove 'External Sharing' related list. It is bad we cannot configure to hide the "Stop Sharing" link. But "Stop Sharing" link will show based on user permission.
The users that will see the link are:
1. Users with Modify all Permission
2. Users owning the record
3. Users above the record owner in the role hierchy

Wednesday, May 1, 2013

Salesforce to Salesforce: how is the owner in partner instance?

In previous blog, we have discuss on how to set up Salesforce to Salesforce between 2 instance. So your data can transferred to your partner Salesforce without 3rd party and complex ETL process.

A user come to me this morning, for some reason, he want to know who is the owner of the account and opportunity in partner instance, because once record transferred over to our Salesforce, the owner will be change to the connection user and no information who owned it in partner instance.

Solution:
  • In Publisher instance, create new text field called 'Corp A owner' in account
  • Write a simple trigger to populate owner name from Account to this new field
  • Publish the newly created field in Salesforce connection
  • In Subscriber instance, create the same text field 'Corp A owner' in account
  • Map it in Subscribed Objects
  • Done
Once, the data transferred over, we will know who is the owner for that account, so our Sales Rep can directly contact Sales Rep in Corp A. And, we also can use the same way to transfer over Sales Rep in our company to partner Salesforce for two-ways data sync.

Trigger reference:
trigger updateTextOwner on Account (before insert, before Update)
{
    for (Account accs : Trigger.new) {
            User u = [Select Id, Name from User where id = :accs.OwnerId];
            accs.Text_Owner__c = u.Name;
    }
}

Salesforce to Salesforce: Getting Started !


Salesforce to Salesforce is great feature from Salesforce:
  • Allow different companies which using Salesforce or Force.com to transfer data without 3rd party
  • Out-of-the-box feature from Salesforce in any edition (Group to Unlimited edition)
  • Real-time data sync
  • One-way or Two-way
  • Any object and fields can be configured
  • Manual or Automatic data transfer method in Publisher instance
  • Manual or Automatic to accept record in Subscriber instance
  • As Publisher and subscriber with multiple Salesforce instance
  • Free of Charge

Limitation (as of 1st may 2013):
- Not able to modify notification email
- Need to write apex trigger to automate data transfer


How to Start?

1. Enabling Salesforce to Salesforce (S2S) 
Setup - App Setup - Customize - Salesforce to Salesforce - Settings
Activate Enable checkbox, please note that enabling Salesforce to Salesforce is not reversible, however, you can deactivate connection create.


2. Setting up Connection
  • Once you activate S2S, system admin will find new tab "Connections".
  • If your partner contact have not in your Salesforce, create your partner Contact (and Account) with email address, your partner will receive invitation email in this email address.
  • Determine a connection user, the connection owner will receive all email notifications including system notifications in case there is a functional error when the connection is inserting/updating a record. Additionally, the connection owner will be assigned as the default owner of any new records, though this may be overridden by any assignment or other rules that determine record ownership.
  • Enter all information needed enter, click "Save & Send Invite", your partner will receive email to accept it.
  • Once the invitation is accepted, the connection between your Salesforce and partner Salesforce is established, no data are shared yet at this stage


3. Publishing Objects
Let's say you will send data from your Salesforce to your partner.
  • Go to Connection created and scroll to 'Published Objects' related list, click 'Publish/Unpublish' button.
  • Select object you need to publish and click Save
  • Click Edit link in Action column for each object, you can select fields you want to be published to your partner


4. Subscribing to Published Objects
Now, your partner need to subscribe for objects you have published.
  • Go to Connection created and scroll to 'Subscribed Objects' related list, click 'Subscribe/UnSubscribe' button.
  • You will find objects being published from partner company and you need to map it to your object. It is important here to determine if you want to Auto-Accept record transferred over for each object. If this is not select, the connection user need to accept it manually.
  • Click Edit link in Action column for each object, you need to map fields between your partner Salesforce field with yours.
  • Click Save and Done.


5. Forward record
Up to Step 4, connection and fields mapping has been established. Out-of-the-box, user need to forward record they need to transfer.
  • Go to record page layout and scroll down to 'External Sharing' related list.
  • For Account, click 'Forward this Account' button, you will see option to forward related objects to Account which has been configured in connection above, also option to send notification email.
  • Once a record is forwarded, it will be shown in 'External Sharing' related list and at the top of page layout.


6. Mass forward records
If your profile have 'Manage Connections' permission, you can forward records in bulk.
Go to object tab, select a View. You will find button 'Forward to Connections'. Select records to forward and click that button.

7. Make it Automatic
From step 5-6, we are talking about to forward record manually. But, in many cases, business need this to be automatic. To achieve this, we need to write apex trigger which insert record to PartnerNetworkRecordConnection object. Sample apex code:
PartnerNetworkRecordConnection newConnection =
  new PartnerNetworkRecordConnection(
      ConnectionId = networkId,
      LocalRecordId = newContact.Id,
      SendClosedTasks = false,
      SendOpenTasks = false,
      SendEmails = false,
      ParentRecordId = newContact.AccountId);
insert newConnection;


Reference: